You did your research, found the right rifle and scope combination, and put in real time at the range. Your 100-yard groups are tighter than you expected, and you're feeling good about your setup. So you're ready to hunt, right? For shots inside 150 yards, mostly yes. But the further your target, the more holdover starts creeping into the equation, and that means compensating on the fly under pressure. What if your zero could do more of that work for you? What if there was a way to squeeze more usable, hold-dead-on distance out of the setup you already have? There's a zeroing method that works with your bullet's natural flight path to do exactly that. It's called maximum point-blank range, and it might change the way you think about zeroing entirely.
What Is Maximum Point-Blank Range?
A standard 100-yard zero puts the bullet on your line of sight at 100 yards. Every bullet follows a curve, and past your zero it drops steadily — the further the target, the more holdover you need to compensate.
Maximum point-blank range is a zeroing method that works with that arc instead of ignoring it. Rather than picking an arbitrary zero and calculating holdover from there, MPBR lets you zero your rifle so the bullet arcs up through the top of the vital zone, peaks, and falls back through the bottom — all without ever leaving the kill zone. As long as you stay within that distance, you can aim dead-center and put the bullet in the vitals. No holdover. No guessing under pressure. Point, shoot. Period.
MPBR is the farthest distance at which your bullet stays within the kill zone throughout its entire flight. Everything from the muzzle to that distance is hold-dead-on range.
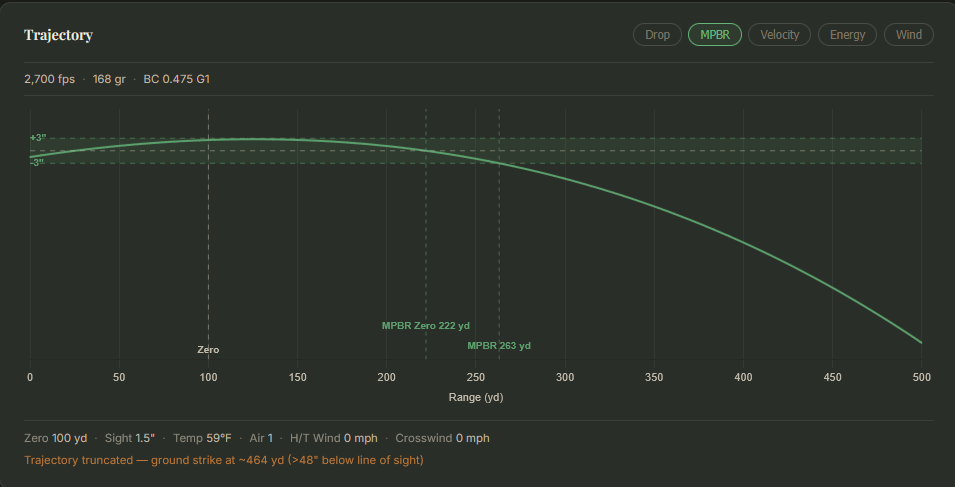 The curve rises through the vital zone band, peaks, and returns to the floor at 263 yards. That is your maximum point-blank range with this load.
The Kill Zone Is the Key
MPBR is not a fixed number. It changes with your load, and it changes with your target. The reason is straightforward: maximum point-blank range is built around the kill zone, and kill zones are not all the same size.
A whitetail deer, for instance, has a vital zone roughly 10 inches across. Set your target animal size to large game (6-inch radius), and the calculator treats that as your tolerance band: 3 inches of rise above your line of sight and 3 inches of drop below it. Your bullet can go anywhere inside that window and still connect.
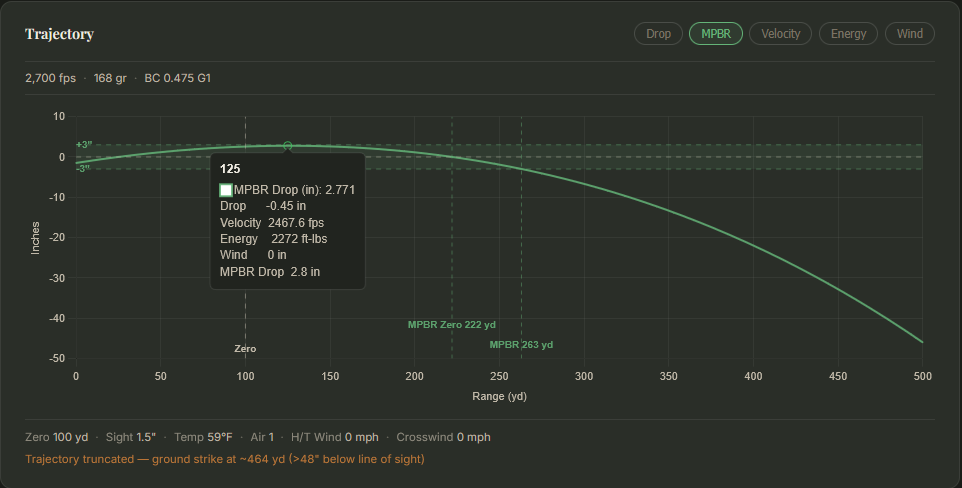 At 125 yards, the bullet is +2.8 inches above line of sight — near the top of the kill zone band, but still inside it.
The band is what makes MPBR work. At close range the bullet is still climbing toward the top. Somewhere in the middle it peaks near the top of the band before it begins to fall. By the time it reaches maximum point-blank range, it has come back down to the floor. Every yard in between is hold-dead-on range.
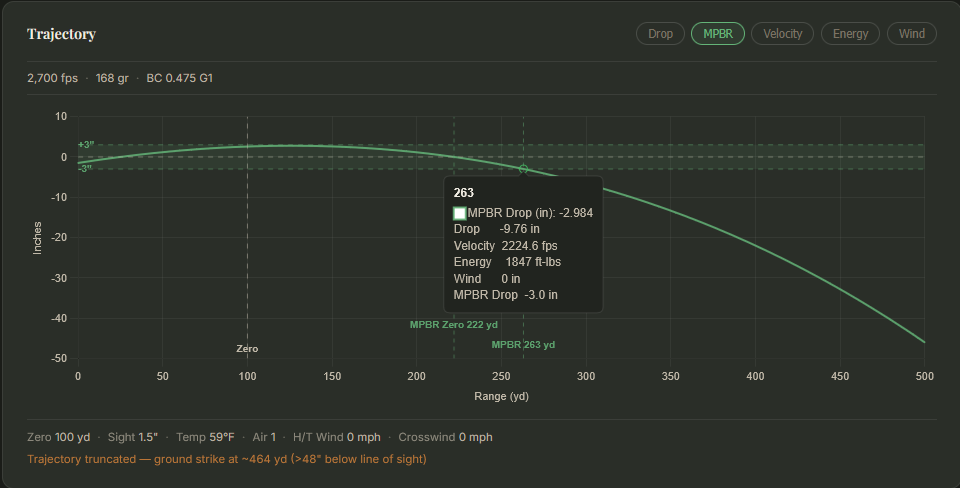 At 263 yards, the bullet is at -3.0 inches — exactly at the kill zone floor. This is the limit of hold-dead-on range with this load.
Change the kill zone size and the MPBR changes with it. A larger vital zone gives you more room to work with. A smaller one tightens the window. The geometry is the same either way: MPBR is always the farthest distance where the bullet never leaves the band.
How the Zero Changes Everything
A standard 100-yard zero is a reasonable starting point. At 100 yards the bullet is on your line of sight, and for shots inside 150 yards or so it performs well. But it does not make full use of the kill zone. Most of the bullet's arc above the line of sight is wasted, and the bullet drops below the 3-inch floor well before it has gone as far as it could.
MPBR changes the zero to fix that. Instead of zeroing at 100 yards, the calculator finds the zero distance that positions the arc optimally inside the kill zone band — high enough to use the full rise, low enough to extend the hold-dead-on range as far as possible. With the default load, that zero falls at 222 yards.
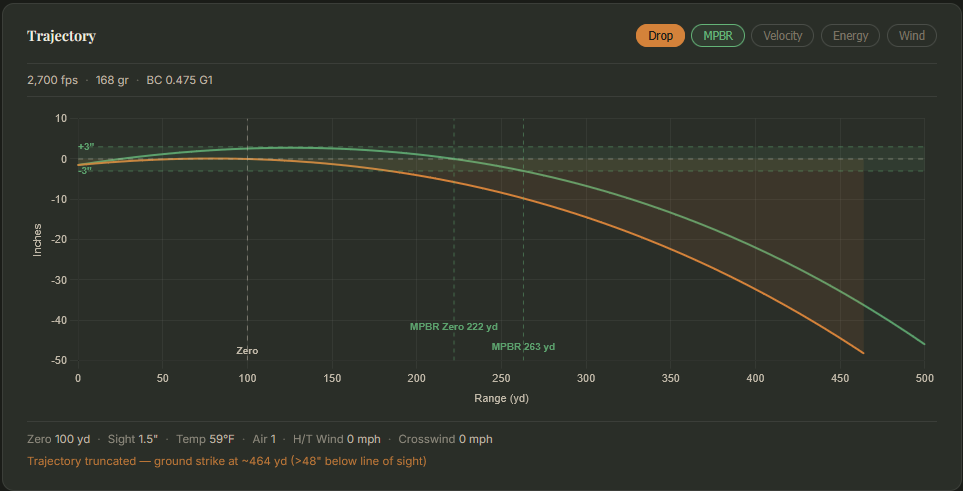 The orange curve shows a standard 100-yard zero. The green curve shows the MPBR zero. The difference in usable range is visible.
The result is a meaningful gain in hold-dead-on range. With a standard 100-yard zero, the bullet drops below the 3-inch kill zone floor at 183 yards — at which point holdover becomes necessary. The MPBR zero extends that to 263 yards. With this load, that is 80 more yards of hold-dead-on range.
The difference is not dramatic on paper. But at the range it means you can hold dead-center on anything from the muzzle out to 263 yards and trust the bullet to find the vitals. With this load, that is 80 more yards of hold-dead-on range than a standard 100-yard zero provides.
One practical note: you do not need a range that reaches your MPBR zero distance to achieve this zero. The bullet crosses your line of sight twice — once on the way up, and again on the way down at the MPBR zero. In this example, that near zero falls around 25 yards. Zero there and you are zeroed at 222. Many indoor ranges and outdoor facilities can accommodate that, even when longer distances are not available.
What MPBR Looks Like in Practice
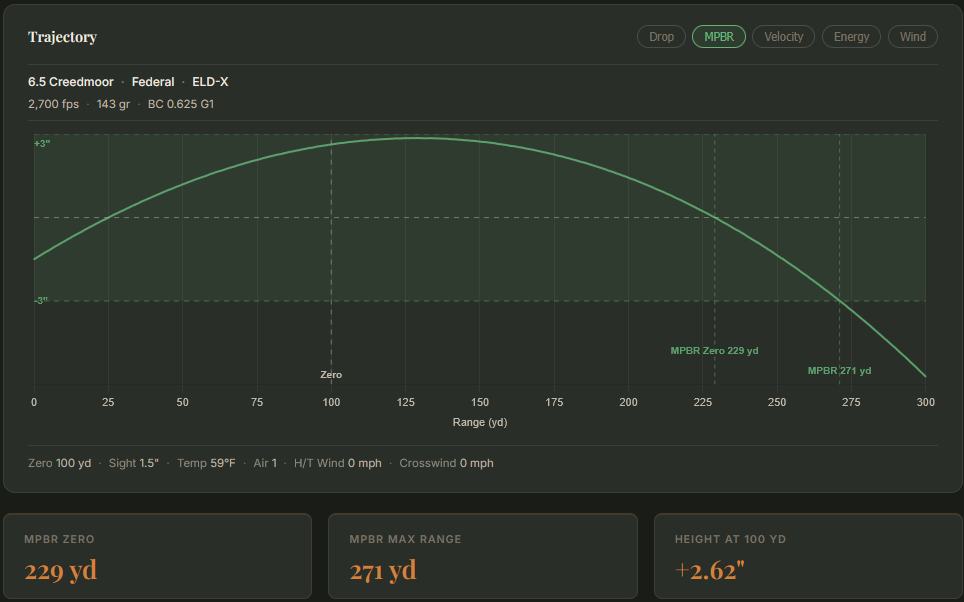
The concepts in the previous sections are easier to follow when you can see them with a real load. Here is what MPBR looks like when you run the Federal 6.5 Creedmoor 143gr ELD-X through the calculator — 2,700 fps, BC 0.625 G1, standard conditions.
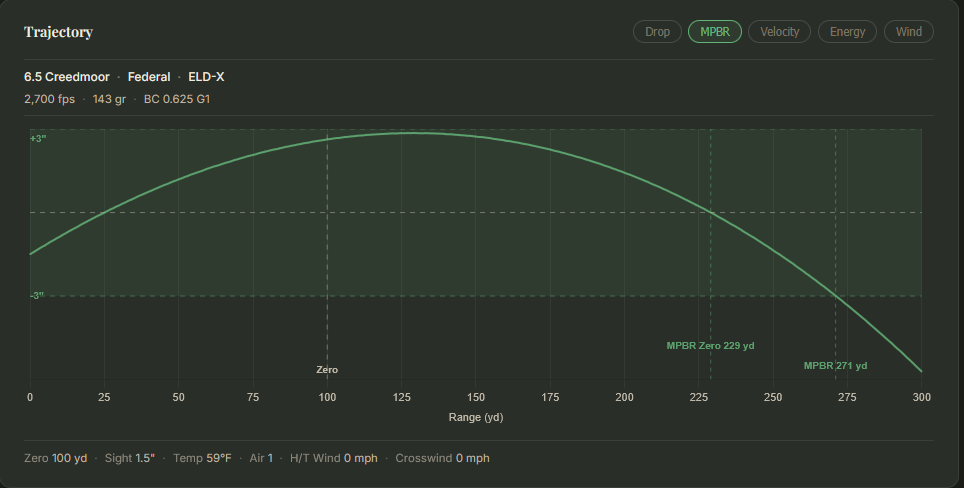 Federal 6.5 Creedmoor 143gr ELD-X, MPBR zero at 229 yards. The bullet stays within the 6-inch kill zone band from the muzzle out to 271 yards.
The calculator sets the MPBR zero at 229 yards. That is the distance where the bullet completes its arc through the kill zone band and crosses back through your line of sight on the way down. From there, the bullet continues to fall and exits the bottom of the band at 271 yards. That is your maximum point-blank range with this load. Aim dead-center anywhere from the muzzle to 271 yards and the bullet stays in the vitals.
To see exactly where the bullet sits at different points along that arc, hover over the graph. At 129 yards, near the top of the arc, the bullet is riding +2.9 inches above your line of sight — just inside the top of the kill zone band.
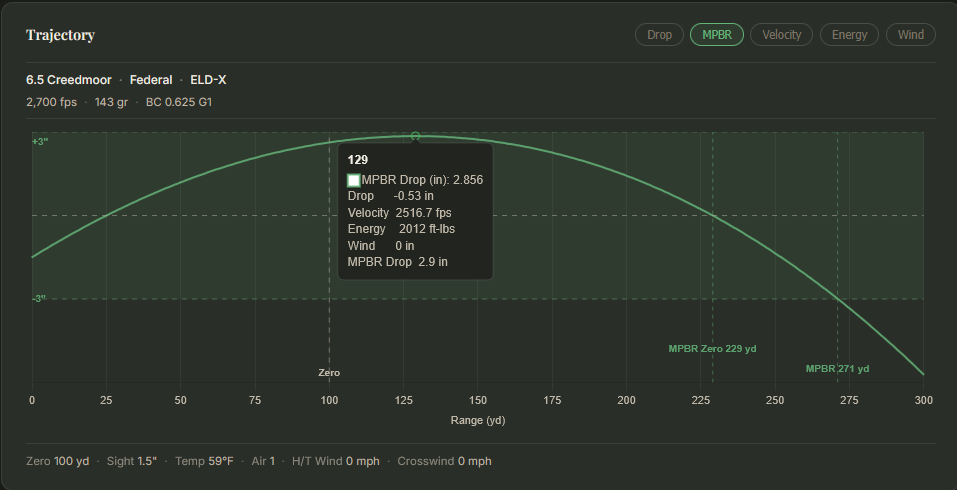 At 129 yards, the bullet is +2.9 inches above line of sight. Still well within the kill zone.
At the far end, 271 yards, the bullet has settled exactly to the kill zone floor at -3.0 inches. That is the limit. One yard further and it exits the band.
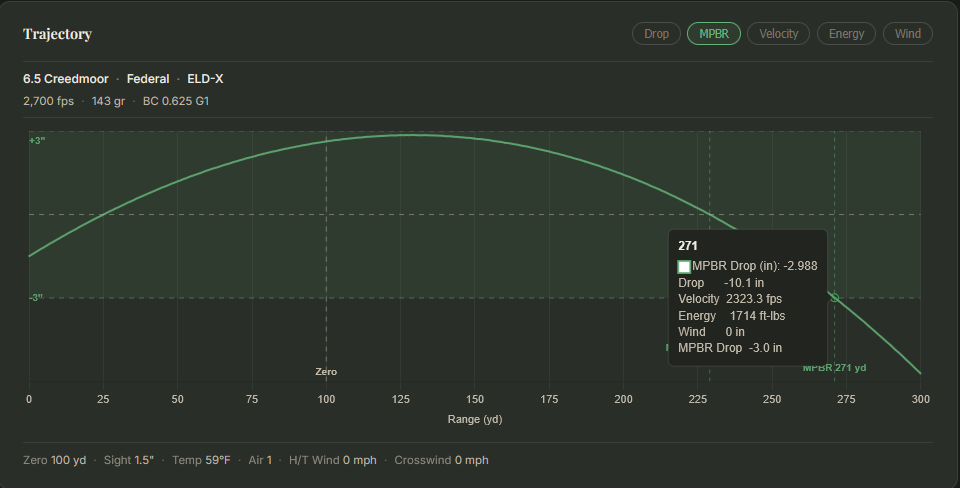 At 271 yards, the bullet is at -3.0 inches. The kill zone floor. This is your maximum point-blank range with this load.
One more thing worth considering before you call 271 yards your practical limit: terminal energy. A bullet that lands in the vitals still has to perform. Most hunters and wildlife managers recognize 1,000 ft-lbs as a reasonable minimum for ethical kills on deer-sized game. At 271 yards, this load is carrying 1,714 ft-lbs — well above that threshold. The geometry works, and the energy backs it up.
When you run your own load, check both numbers. If the MPBR math gets you to 300 yards but energy drops below 1,000 ft-lbs before you get there, let energy set your practical limit. The calculator shows you both. Use both.
What MPBR Is Not
MPBR is a genuine advantage. A well-chosen zero that keeps your bullet in the kill zone from the muzzle to 271 yards is real, and it does simplify your shot under pressure. But it is worth being clear about what it does and does not handle for you.
MPBR eliminates holdover within its range. It does not eliminate range estimation. You still need to know whether the deer is at 180 yards or 260 yards, because that gap matters even when both distances fall inside your MPBR. The method assumes you are holding on the vitals, not guessing at the distance and hoping the math bails you out.
Wind is the other variable MPBR does not touch. A 10 mph crosswind moves a 6.5 Creedmoor bullet several inches at 250 yards. The kill zone band runs vertically, not horizontally. MPBR keeps you in the vitals top to bottom, but a wind call is still your responsibility.
And none of this replaces marksmanship. A clean hold, a good trigger pull, and knowing your limits as a shooter matter at every distance. MPBR gives you a smarter zero, not a margin for sloppy execution.
Used correctly, MPBR is a tool that removes one variable from a shot that already has several. That is worth a lot in the field. It is just not worth everything.
How to Find Your MPBR With the BSL Calculator
Everything covered in this article is load-specific. The 6.5 Creedmoor numbers used in Section 4 are real, but they belong to that cartridge and that load. Your rifle, your ammunition, and your conditions will produce different results. The only way to know your MPBR is to run your own load.
Start by selecting your cartridge in the calculator. Choose your manufacturer, bullet, and weight from the database, or enter a muzzle velocity and BC manually if you are working from a handload or a load not yet in the system. Set your sight height, confirm your conditions, and select your target animal size under the MPBR settings. For whitetail, large game (6-inch radius) is the right choice.
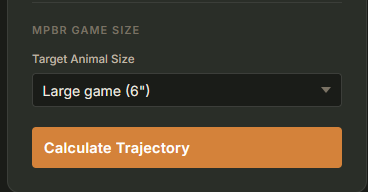 Set your target animal size before running the MPBR calculation. Large game uses a 6-inch radius, matching a whitetail vital zone.
Once your load is entered and Calculate Trajectory is clicked, switch to the MPBR tab. The calculator does the rest. The graph shows your bullet's arc through the kill zone band, and the stat cards below give you the three numbers that matter: your MPBR zero distance, your maximum point-blank range, and your height at 100 yards.
 MPBR Zero, MPBR Max Range, and Height at 100 yd — everything you need to take the result to the range.
That last number is the one to take to the range. Zero your rifle so your point of impact is +2.62 inches high at 100 yards and you are zeroed at 229. If your range does not go to 100 yards, hover over the graph at whatever distance you have available. The calculator will show you the exact height needed at that distance to achieve the same zero. Any distance works.
From there, every shot inside your MPBR is a dead-center hold. No holdover, no adjustment, no math in the field. Just know your distance, stay inside your range, and trust your zero.